Showing posts with label birch poles. Show all posts

Friday, October 2, 2009

Birch Poles at Bergdorf's

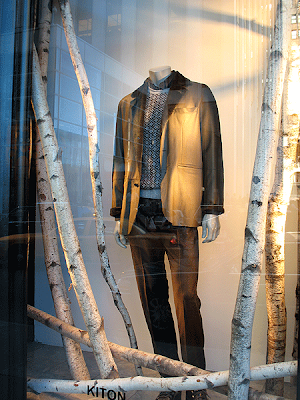
Birch Poles were used for the fall window displays at Bergdorf Goodman in Manhattan. I like how different orientations were used to create a somewhat chaotic display to frame the mannequins.


Tuesday, April 28, 2009

Green Wedding Design and Decorative Branches

Substituting decorative branches for fresh flowers is a fantastic way for event designers, wedding planners and others who handle events to greatly reduce the ecological costs of their events, while providing dramatic visual impact and significant financial savings. Today, these benefits are more relevant than ever. 

Instead of each and every event requiring large volumes of flowers, often flown in from another hemisphere and which will be discarded at the end of the night - decorative branches on hand from prior events - can be used for the present event - and then reused for future events. In addition to the dramatic ecological savings, significant money can be saved, as instead of one event having to cover the entire cost of the botanical decor, the cost of the branches can be factored across multiple events. 

Simon Daykin of Firefly Occasions has been using our Manzanita Branches and Birch Poles just this way for over a year now to create the trees that have become the company's signature pieces. 


The trees are assembled on site for every event. Birch Poles are set in christmas tree bases and then topped with Manzanita Branches.


Different accents are used on the trees to complement the other decor and tailor the trees for the event.


A beautiful final touch is lighting the trees from below, which really brings out and adds drama to the pieces. 


Firefly Occasions specializes in haute couture weddings and luxurious event design. The company is based in Calgary, AB, Canada but can coordinate weddings world wide. You can reach them at 1-800-791-5636.

Thursday, November 13, 2008

Afternoon Sunlight


Here's a picture taken in my apartment as the afternoon sunlight was illuminating an arrangement of Protea Repens and Preserved Cedar. In the background is a bundle of Paper Birch Forks


Thursday, October 2, 2008

Birch Pole Wedding Arch


Here's a picture a customer sent us of a beautiful wedding arch constructed from our Paper Birch Poles. Note the use of paired poles for the supports, which helps balance differences between individual poles and results in more visually substantial looking supports. 

Related Posts:
Chuppa Construction: Attaching Fabric to the Poles

Wednesday, September 10, 2008

Chuppa Construction: Attaching Fabric to the Poles

Although chuppa poles are typically set in a stationary base, another alternative is to have friends or family hold the poles. However, this means that the chuppa poles are going to be moving around, which might tear the fabric.

On A Practical Wedding, there's a post describing a very clever way to attach the fabric to chuppa poles (in this case our Paper Birch Poles) that will be carried by friends or family - bungee cords.


The bungee cords help reduce the tension on the fabric, reducing the risk that it will tear. Head over to the post on A Practical Wedding for more of the details.

Also, here are a few related and relevant posts:


Friday, June 13, 2008

Birch Poles as Chuppa Poles - Two Better than One?

Birch Poles make great chuppa poles and indeed, our 6-8' Paper Birch Poles make their way into quite a few chuppas. Typically, a single Birch Pole is used at each corner of the chuppa, such as in this post on Wedding Bee titled "It’s Not A Chuppah… Ok So It Kinda Is".  One pole per corner has worked great for innumerable chuppas, but could two be better? 

On my way through the flower district today, I came across these chuppa poles sitting outside a store that rents items for events, waiting to be put on a truck for their next assignment. 


To answer the question posed in the title, "yes!" - two is better than one (unless people will be holding up the chuppa poles, of course, oh, and I am sure there are other circumstances as well, so perhaps the yes shouldn't be as emphatic, but generally, I reiterate, "yes!"). 

The first benefit is that pairs of Birch Poles can be matched to produce a fairly balanced set of chuppa poles. Like with any natural botanical item, individual Birch Poles have an inherent degree of variability (and that's much of the charm), that in a display can be averaged out by using more than one pole. Why wouldn't making chuppa poles from single, albeit relatively consistent Birch Poles be just as good as using pairs? Because...

The second benefit is that using a pair of Birch Poles will result in a much more substantial looking chuppa pole than a single Birch Pole - Birch Poles that can be shipped for less than a fortune typically start at 1.5 inches and top out at around 3 inches. Pairing individual Birch Poles will double the diameter of the resulting chuppa poles so they don't look too spindly to the guests at the back.  

Last but not least, there is the symbolism of using pairs of poles to support the canopy. Weddings are very much about symbolism, and your chuppa poles are yet another opportunity to add some more to the ceremony  - the more the marrier, I mean merrier. 

Now onto the bases - nothing more than simple, inexpensive terra cotta garden pots filled with concrete (and painted white - time for a new coat of paint though). 


Quite heavy, of course, but you want that to keep the chuppa stable, and you can put the groomsmen to good use moving them around. The pots are also relatively tall - about 18 inches, providing an opportunity to boost the poles up at least 6 inches or so. If you want an especially high canopy, all you'd need to do is set the bases in which the poles are secured onto another set of bases, such as an inverted flower pot covered in cloth.
Wednesday, January 30, 2008

Birch Trees vs. Birch "Trees"

Here's a picture of our 6-8 foot Paper Birch Trees, both opened in the foreground, and closed in the background (closed is how they appear straight out of the bundle).


The Paper Birch trees open up (even when they are crispy-dry as this one was) into a nice, airy tree that makes a dramatic accent if you have the space. The drawbacks are that the diameter of the trunks are about 1" at the base, and the branches are where they are for better or worse.

If you are looking for a tree with a relatively substantial diameter, and want to dictate where the branches are, you should consider making a "tree." Here's a picture of one that we put together with a Paper Birch Pole, 2 bundles of Himalayan Birch Brush (~30 branches), and some ribbon to add a colorful accent:


We knew that we wanted to put this tree into a corner, so rather than adding branches all around the trunk, we only did about 1/3 (so for a full tree, you'll probably want 90 birch branches or so - 6 bundles of the Himalayan Birch Brush.

Below is a picture of the tools and supplies we used, and the secret weapon I discovered on a long journey through the aisles of one of those big-box hardware stores - the lowly 10" by 12" wall bracket from the "Home Organization" section (I searched fruitlessly in the plumbing, lumber and hardware sections). These were $1.09 a piece, so you are looking at about $5 per pole to get them to stand upright.


Here's what you'll need to create this tree:

Electric Screwdriver;
Four 10" by 12" Shelf Brackets;
1.25" Coarse Thread Drywall Screws;
Drillbit (1/4" worked well for the Himalayan Birch Brush);
Phillips head attachment for your drill;
Your trusty jackknife.

And here's how to do it:

1. Attach the brackets. Stand the pole up straight, and start attaching the shelf brackets with the drywall screws. You'll want to attach the short end of the bracket to the pole, and have the long end on the floor for stability. Attach them at the top first. Once you have all four brackets attached at the top, secure the bottom. This process should take you 5-10 minutes.

Now that you have your pole standing straight and sturdy, it is time to start attaching the branches. Here's the plan of attack - you'll want to start at the bottom, and work your way up to the top. To mimic the way branches grow naturally, you'll want to start by angling the branches out a little less than 45 degrees at the bottom, and move the branches towards the vertical as you make your way up the pole.

2. Drill a hole. As mentioned above, you'll need to drill down at an angle. To avoid marring the bark too much (like I initially did) start by drilling straight in a little bit, and then angle the drill downward.

3. Grab a branch. Open the branch, then whittle the base of it to fit in the hole. (Careful with the whittling - I have two nice scars on my left hand due to childhood whittling mishaps.) On most of the branches, you'll see there is a slight curve - you'll want that curve facing upwards.

4. Repeat. Over-and-over-and-over again, although remember to tighten the angle of the branches as you move up the pole. Constructing a tree from start to finish will probably take an hour or two, but is a heck of a lot of fun.

While we used Himalayan Birch Brush in this example, you can use any other style of birch brush, including the Goldleaf Birch Branches and the White Sparkle Birch Branches.

Questions? Ask away!